本文主要介绍WebSocket以及Websocket在Golang中的实现和使用。
1. WebSocket是什么?
这里先列两篇文章:
- 《WebSocket 是什么原理?为什么可以实现持久连接?》,这个是知乎上的一篇文章,对于WebSocket讲的通俗易懂,建议先看一下。
- The WebSocket Protocol RFC6455,这个是WebSocket的RFC文档,所以内容非常全面(当然只涉及协议,不涉及具体实现),不过内容太多,如果是初次了解,可以挑自己感兴趣的看看。或者直接看我的文章。
1.1 为什么会出现WebSocket
在介绍WebSocket之前,我们先来了解一下为什么会出现WebSocket。我们知道HTTP协议(底层使用的是TCP协议)是无状态的,即一次Request,一个Response就结束了。实际中的场景就是客户端(比如浏览器)向服务器发送一次请求,然后服务器返回一个响应,一次交互就结束了,底层的TCP连接也会断掉,下次请求时,重新再创建新的连接。而且这种通信是被动式的,就是说服务器端不能主动向客户端发响应,只能是客户端一个Request,服务的一个Response这种模式(当然最新的协议里面,可能可以将多个Request合并一次发给服务端,但模型仍旧是这种模式)。
如果你曾经使用TCP协议写过通信程序,应该非常熟悉那种模式:客户端和服务端(有时都没有清晰的界限)通过三步握手建立连接后,就可以相互随便发送数据,除非网络异常或者主动关闭,否则该TCP连接将一直存在。而WebSocket的出现就是为了在应用层实现类似传输层的TCP协议,当然它底层和HTTP一样使用的是TCP协议。这样我们就明白一些了,WebSocket不像HTTP协议,一次交互后就结束,它建立后会一直存在(除非主动断开或者网络异常等),而且客户端和服务端可以任意向对方发送数据,不再像以前那么“傻”了。也就是说,HTTP协议是一次性的,“单工的”;而WebSocket是真正意义上的长连接,且是全双工的。当然,上述提及的需求HTTP通过poll和轮循等方式也可以实现,但弊端非常多:
- 服务器端需要在底层为每个HTTP连接维护一个TCP连接,比如一个用于发送消息,一个用于接收消息等。
- 资源浪费,每次的HTTP请求中都需要携带消息头。
- 客户端还必须通过一些手段知道哪些响应对应发出去的哪些请求。
好吧,这就是为什么出现了WebSocket。
1.2 WebSocket和HTTP、TCP的关系
从前一节的介绍我们知道WebSocket的出现是为了弥补HTTP协议的一些不足,但二者本质上是两个完全不同的协议。但为什么WebSocket在我们印象中总是和HTTP协议有着千丝万缕的关联呢?这是因为HTTP协议出现的比较早,而且各项功能相对比较完善,而WebSocket与HTTP一样也主要是定位于Web开发,所以就借用了HTTP的一些基础设施。说的再细点就是WebSocket借用了HTTP的握手过程(所以复用了HTTP的端口80和443),待认证完成升级为WebSocket协议后,就和HTTP没有半毛钱关系了。RFC6455中是这样描述的:
Its only relationship to HTTP is that its handshake is interpreted by HTTP servers as an Upgrade request.
但是我们心里应该时刻明白,WebSocket本质上和HTTP是两个完全不同的协议。而且按照RFC标准,以后WebSocket可能会实现简单点的完全属于自己的握手过程,这样就真的和HTTP没有什么关系了。
WebSocket和TCP协议的关系很简单:WebSocket底层使用的是TCP协议。
1.3 WebSocket协议介绍
虽然WebSocket是应用层的“TCP”协议(我自己的看法),但相比于TCP协议还是简单了很多。协议包含两部分:
- 握手过程(handshake)
- 数据传输(date transfer)
握手过程中客户端的请求格式一般为(摘自RFC6455):
GET /chat HTTP/1.1
Host: server.example.com
Upgrade: websocket
Connection: Upgrade
Sec-WebSocket-Key: dGhlIHNhbXBsZSBub25jZQ==
Origin: http://example.com
Sec-WebSocket-Protocol: chat, superchat
Sec-WebSocket-Version: 13
服务器端的响应格式一般为:
HTTP/1.1 101 Switching Protocols
Upgrade: websocket
Connection: Upgrade
Sec-WebSocket-Accept: s3pPLMBiTxaQ9kYGzzhZRbK+xOo=
Sec-WebSocket-Protocol: chat
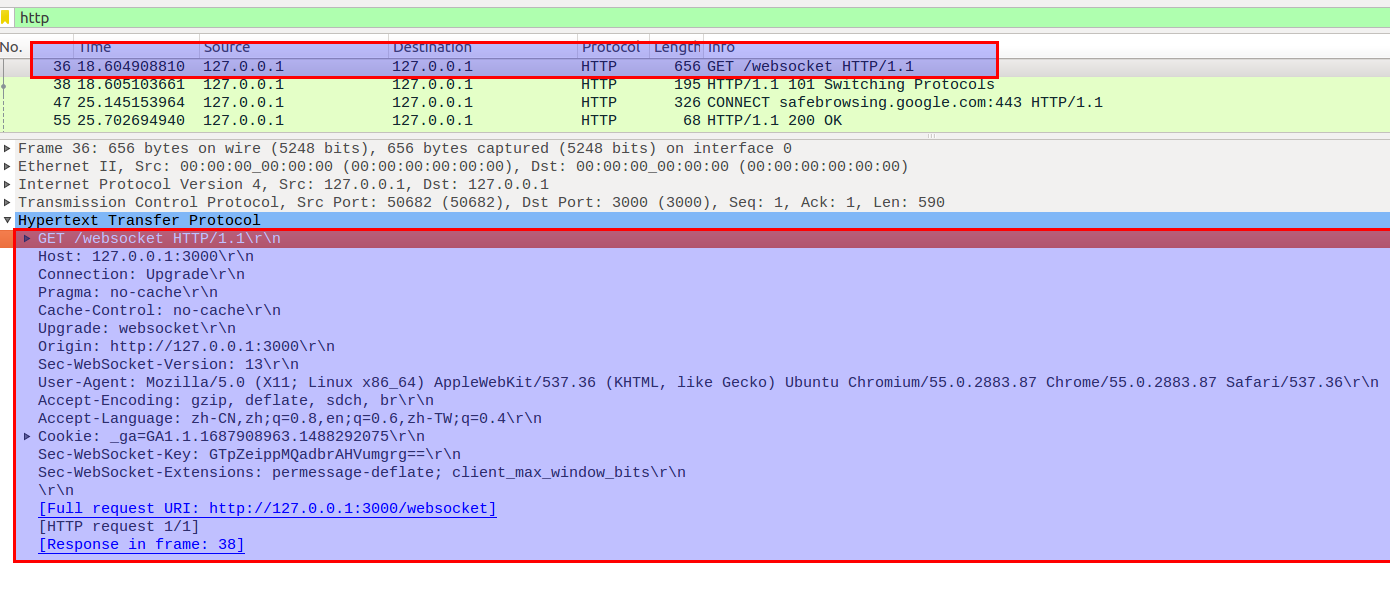
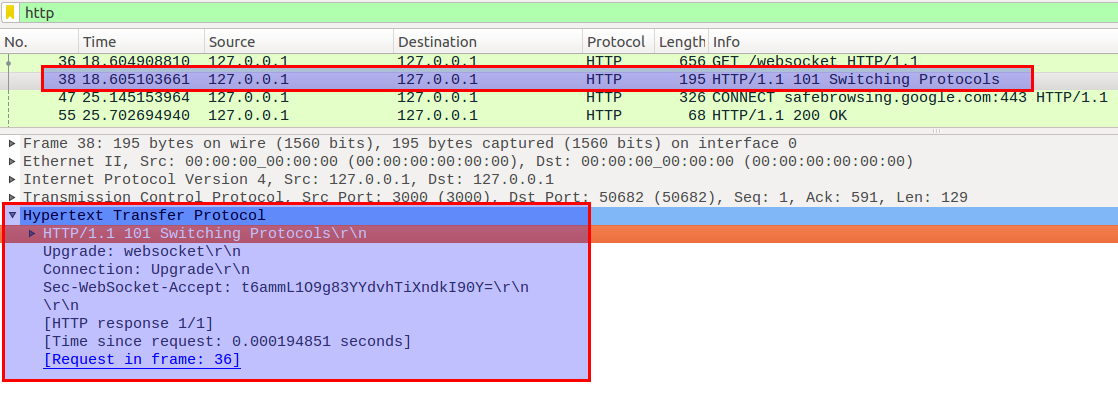
下面是我用wireshark抓的一个WebSocket握手过程的包(也可以使用浏览器的开发者工具查看请求和响应的Header...作为C开发者表示还没有习惯和熟练掌握Web的调试开发orz...):
客户端请求:
服务器端响应:
因为头部字段的顺序是没有意义的,而且有些字段是可选的,所以实际的输出和RFC文档有些差异。至于每个字段是什么含义,请参阅https://tools.ietf.org/html/rfc6455#section-1.3。
握手成功后,连接就会一直存在,双方就可以任意相互发送数据。WebSocket之间的数据一般称为“消息(Message)”,而一个消息往往由很多帧(Frame)组成,有点类似于数据链路层帧的概念。一个消息在传输到底层时,可能被拆分开。每个数据帧都和一种特定的类型相关联,目前定义了6种类型,预留了10种未来使用:
- %x0 denotes a continuation frame
- %x1 denotes a text frame
- %x2 denotes a binary frame
- %x3-7 are reserved for further non-control frames
- %x8 denotes a connection close
- %x9 denotes a ping
- %xA denotes a pong
- %xB-F are reserved for further control frames
使用TCP协议做过设计的应该都知道,一般会分数据面和控制面的消息,WebSocket也一样,提供了两种类型的消息:数据帧类型和控制帧类型。数据帧包括上面的%x1和%x2两种,文本类型消息使用UTF-8,二进制类型的消息一般由程序自己定义;控制帧类型包括上面的%x8、%x9、%xA三种,Close消息很明确,表名要关闭连接,而Ping和Pong则没有明确定定义,一般用于心跳消息,而且Pong一般是讲Ping的消息原封不动的发送回去。
WebSocket协议相对于TCP协议虽然简单,但也有很多细节,不过都不是很复杂,本文就不深入介绍了,而且我觉得协议这种东西除非要经常使用,否则可以在具体用的时候再去查细节,不然时间久了也会忘记,毕竟已经过了实战的时候不是像闭卷考试一样需要死记硬背,只要掌握获取知识方法即可,好吧,又跑题了,最后附上一个协议细节图(摘自RFC6455):
0                   1                   2                   3
0 1 2 3 4 5 6 7 8 9 0 1 2 3 4 5 6 7 8 9 0 1 2 3 4 5 6 7 8 9 0 1
+-+-+-+-+-------+-+-------------+-------------------------------+
|F|R|R|R| opcode|M| Payload len |    Extended payload length    |
|I|S|S|S|  (4)  |A|     (7)     |             (16/64)           |
|N|V|V|V|       |S|             |   (if payload len==126/127)   |
| |1|2|3|       |K|             |                               |
+-+-+-+-+-------+-+-------------+ - - - - - - - - - - - - - - - +
|     Extended payload length continued, if payload len == 127  |
+ - - - - - - - - - - - - - - - +-------------------------------+
|                               |Masking-key, if MASK set to 1  |
+-------------------------------+-------------------------------+
| Masking-key (continued)       |          Payload Data         |
+-------------------------------- - - - - - - - - - - - - - - - +
:                     Payload Data continued ...                :
+ - - - - - - - - - - - - - - - - - - - - - - - - - - - - - - - +
|                     Payload Data continued ...                |
+---------------------------------------------------------------+
2. Go中的WebSocket
上面我们了解了WebSocket协议后,我们来看一下Go中对于WebSocket的实现。Go官方的标准包里面提供了一个WebSocket的包 golang.org/x/net/websocket,但也说的很明确,这个包里面并没有实现WebSocket协议规定的一些特性,而推荐使用github.com/gorilla/websocket这个包。所以实际中,我们如果使用到了Go的WebSocket也一般使用后者,本文也介绍的是后者。这个包的内容不是很多,而且README里面对于这个包的使用也说的比较清楚和详细,所以这里就不再做翻译工作了,这里用一个例子来作为介绍。推荐使用gowalker去查看Go文档,如果使用Mac的话,推荐使用Dash,比如该包的文档可去https://gowalker.org/golang.org/x/net/websocket查看。
我们创建一个Go工程,比如go-websocket,里面包含一个html目录和一个main.go文件,html目录下有一个index.html,代码分别如下:
html/index.html:
<!DOCTYPE HTML>
<html>

<head>
    <script type="text/javascript">
        function myWebsocketStart() {
            var ws = new WebSocket("ws://127.0.0.1:3000/websocket");

            ws.onopen = function() {
                // Web Socket is connected, send data using send()
                ws.send("ping")
                var myTextArea = document.getElementById("textarea1")
                myTextArea.value = myTextArea.value + "\n" + "First message sent";
            };

            ws.onmessage = function(evt) {
                var myTextArea = document.getElementById("textarea1");
                myTextArea.value = myTextArea.value + "\n" + evt.data;
                if (evt.data == "pong") {
                    setTimeout(function() {
                        ws.send("ping");
                    }, 2000);
                }
            };

            ws.onclose = function() {
                var myTextArea = document.getElementById("textarea1");
                myTextArea.value = myTextArea.value + "\n" + "Connection closed";
            };
        }
    </script>
</head>

<body>
    <button onclick="javascript:myWebsocketStart()">Start websocket</button>
    <textarea id="textarea1">MyTextArea</textarea>
</body>

</html>
main.go
package main

import (
    "fmt"
    "io/ioutil"
    "net/http"
    "os"

    "time"

    "github.com/gorilla/websocket"
)

type Person struct {
    Name string
    Age  int
}

var upgrader = websocket.Upgrader{
    ReadBufferSize:  1024,
    WriteBufferSize: 1024,
}

func main() {
    indexFile, err := os.Open("html/index.html")
    checkErr(err)

    index, err := ioutil.ReadAll(indexFile)
    checkErr(err)

    http.HandleFunc("/websocket", func(w http.ResponseWriter, r *http.Request) {
        conn, err := upgrader.Upgrade(w, r, nil)
        if err != nil {
            fmt.Println(err)
            return
        }

        for {
            msgType, msg, err := conn.ReadMessage()
            if err != nil {
                fmt.Println(err)
                return
            }
            if string(msg) == "ping" {
                fmt.Println("ping")
                time.Sleep(time.Second * 2)
                err = conn.WriteMessage(msgType, []byte("pong"))
                if err != nil {
                    fmt.Println(err)
                    return
                }
            } else {
                conn.Close()
                fmt.Println(string(msg))
                return
            }
        }

    })

    http.HandleFunc("/", func(w http.ResponseWriter, r *http.Request) {
        fmt.Fprintf(w, string(index))
    })

    http.ListenAndServe(":3000", nil)
}

func checkErr(err error) {
    if err != nil {
        panic(err)
    }
}运行程序,打开浏览器就可以看到效果了,我们着重讲一下这个程序以及涉及到的知识点。在我的上一篇文章《Go网络编程——Socket》中提到,Go的socket编程中核心结构是Conn,而WebSocket也一样有一个Conn结构,代表一个WebSocket连接,而通过websocket.Upgrader可以得到这样一个结构体的指针。后面就是调用一些方法进行数据的收发了。最后需要强调一个地方就是Upgrader这个类型:
type Upgrader struct {
    // HandshakeTimeout specifies the duration for the handshake to complete.
    HandshakeTimeout time.Duration

    // ReadBufferSize and WriteBufferSize specify I/O buffer sizes. If a buffer
    // size is zero, then buffers allocated by the HTTP server are used. The
    // I/O buffer sizes do not limit the size of the messages that can be sent
    // or received.
    ReadBufferSize, WriteBufferSize int

    // Subprotocols specifies the server's supported protocols in order of
    // preference. If this field is set, then the Upgrade method negotiates a
    // subprotocol by selecting the first match in this list with a protocol
    // requested by the client.
    Subprotocols []string

    // Error specifies the function for generating HTTP error responses. If Error
    // is nil, then http.Error is used to generate the HTTP response.
    Error func(w http.ResponseWriter, r *http.Request, status int, reason error)

    // CheckOrigin returns true if the request Origin header is acceptable. If
    // CheckOrigin is nil, the host in the Origin header must not be set or
    // must match the host of the request.
    CheckOrigin func(r *http.Request) bool

    // EnableCompression specify if the server should attempt to negotiate per
    // message compression (RFC 7692). Setting this value to true does not
    // guarantee that compression will be supported. Currently only "no context
    // takeover" modes are supported.
    EnableCompression bool
}每个成员都有比较详细的说明,这里我们关注一下CheckOrigin这个函数。WebSocket里面对于安全检测的一个非常关键点就是Origin检测,而这个CheckOrigin函数就是做这个事情的,这里提供这个函数就是为了将这个权利交给应用程序自己去实现,默认是nil,表示请求的Origin域必须和header里面的host一致,否则就会握手失败。我们知道HTTP请求的Origin是不可以自己设置和更改的,但是有些客户端是可以随意设置的,这样就没法保证安全,这也是为什么现在WebSocket还只用HTTP去实现的一个原因。我们可以做一个实验,就是将上面的index.html代码中的ws://127.0.0.1:3000/websocket改为ws://localhost:3000/websocket,然后在网页中打开的时候使用http://127.0.0.1:3000/打开,然后我们会发现程序会失败,报“origin not allowed”,这是因为Origin是localhost,而host却是127.0.0.1,二者不一致,握手失败了。我们可以像上面那样去规避这个问题,也可以将原来upgrader的定义改为:
var upgrader = websocket.Upgrader{
    ReadBufferSize:  1024,
    WriteBufferSize: 1024,
    CheckOrigin: func(r *http.Request) bool {
        return true
    },
}
即强制返回true,表示Origin是可以接受的。
至此,本文就结束了,更多关于WebSocket的细节可以去查看RFC 6455文档,更多Go WebSocket的实现可以查看godoc。
 NYC's Blog

如果客户端异常退出,服务端如何判断呢?
服务端和客户端之间有Ping(Server)、Pong(Client)消息,https://tools.ietf.org/html/rfc6455#section-5.5.2
感谢博主,发送ping检测是否断开